
| Self Improvement Non-Fiction posted July 26, 2023 |
  |
How to Get More From the Books You Read
Fine-Tuning Your Kindle For PC
by Jay Squires

I've mentioned on several posts, and in some of my reviews and comments, how it baffles me that everyone—I mean EVERY SINGLE ONE OF US—doesn't have our own free Kindle For PC. What you read below, if you choose to, is my argument.
~ ~ ~
“Some books are to be tasted, others to be swallowed, and some few to be chewed and digested”
— Sir Francis Bacon
2023. Is this the year you finally decided to get your reading program off the ground? Or are you an old hand at it already with 200 or 300 books under your belt from last year? It’s just you and me. So, let me ask you:
Do you feel any smarter?
I met my reading goal last year and I sure as hell don’t feel smarter. And my goal was modest. A book a week, read at the rate of 1/7th of the total allotted pages each day. No day off for my birthday No day off for Christmas. Nada.
And what do I have to show for it? A list of books read. 10 extra pounds. A jangle of disjointed thoughts. (Below is the first page of that list.)
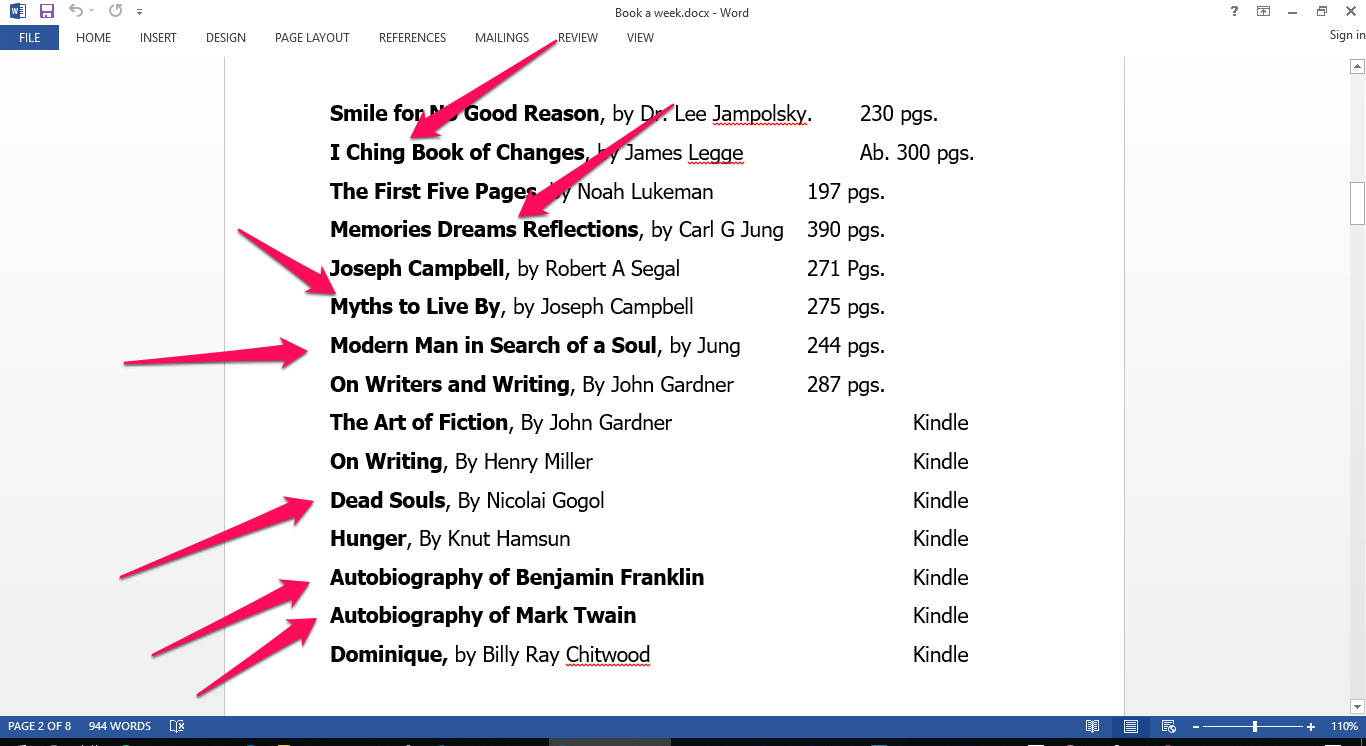
Some of those books were real heavy hitters, as you can see. But the knowledge and angst their authors crammed within their pages were, I have to say now, less important than my commitment to complete them within a designated time.
But I'm compelled to tell you something. I lied a moment ago.
I said I didn’t learn anything from them—and I did. I truly did.
I learned I can enrich my experience far more if I slow my reading down to a word-by-word level and actually engage my brain by taking notes, by highlighting, and summarizing-in-process.
This year, 2023, I cut my commitment in half. 26 books. One every two weeks.
Still, I knew if I wanted to retain what I read, long-term (the proof of that being able to summarize the book in one short paragraph after I finish it, as well as a month or even a year later), I needed to hone some skills that had lain dormant for years.
More than that, though, I had to take ownership of my learning environment. In the course of that ownership, I discovered a great deal about myself and about my medium: the book, specifically, the Kindle book.
Moreover, I found the process is immanently transferrable.
That is the subject of this article.
~ ~ ~
Download Your Free Kindle
Trying to engage you in reading an article about how to increase your knowledge of the Kindle Learning Environment might be a tough assignment. Most of us have a Kindle and it’s easy enough to navigate. However, I’m always amazed by the number of people who haven’t downloaded their free Kindle for PC.¹
That’s where the real magic begins.
And that would also be the reader’s first assignment.¹ It takes minutes. And then you will have created for yourself your own learning environment. It’s like having your personal, secure cubicle in the library. Well, not exactly, but hang with me here.
Ready? Let’s begin.
Open up your PC’s Kindle and gaze at that full spread of screen. Impressive, no? Now check out along the top ribbon and click on the encircled:

What you’ll see will genuinely enrich your INNER learning environment.
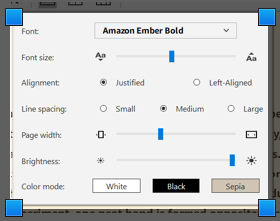
Since you’ll be dedicating from six to who knows how many hours deeply immersed in your subject, it makes sense to make your experience comfortable and enjoyable. Take the necessary time to play around with this screen.
You’ll find virtually everything you need to fine-tune your learning environment. I discovered, for example, that my eye muscles can more easily endure a three-hour block of daily reading when the background is “sepia” rather than the defaulted “white.” And at my age, I prefer the font size a tad larger. And I use the “Ember Bold” to make the font pop.
Once you make your choices, they will be carried over to every book you read, unless you change them. Pretty neat!
The Basic Big Three
The reader may be tempted to skim through the following material, especially if you already own a Kindle device. While it represents ground zero, I’ve included some observations and tips, so you may choose to linger here a while.
Kindle has four highlighting colors: yellow, blue, pink and orange. In the past, by the time I finished a book, it looked like a Mexican fiesta. That was before I streamlined my Kindle to make it a learning environment.
- Be intentional. Know in advance what each colored highlighter represents. I color-coded blue for main ideas or the theme, pink for supporting ideas, orange for the author’s suggestions for further reading, and yellow for anything that’s quotable: something that tickles me or is aptly or colorfully put. These are simply guidelines. Be creative, but …
- Be consistent. In the beginning, I wrote my color code on an index card and kept it by my desk. The important thing, though, is to really think your color code through. You won’t want to change your color code halfway through your book. Why? Because that book may be one of a cluster you’ll read on the same subject, and later you’ll want to cross-index ideas of one book with another. [To illustrate how I “thought it through,” let me explain the reason why I chose blue for the theme. Blue is too dark for my liking and the text behind it tends to fade. Since the theme statement will probably be encountered fewer times, I won’t have to use the color blue often.]
- Be flexible. While flexibility may seem to fly in the face of consistency, what I mean by flexibility is to recognize that when you read fiction as a learning experience (and not just light entertainment), you may use a different set of criteria for what is highlightable. So be just as intentional and consistent with your separate color-coding for fiction.
- Tip: I find it helpful once I’ve highlighted the clearest, most complete expression of the main idea or theme, to click on “Go to → Table of Contents” and highlight the corresponding chapter where that theme is found for speedy future reference.
Your note will be saved to a small icon (looks like a little page), at the end of the sentence you scrolled across to open the command box.

In addition to providing the mechanism for note-taking, where else in your learning environment can you tick a word in the text, and with three successive ticks have at your fingertips, 1. the Oxford English Definition, 2. a deeper exploration through Wikipedia, or 3. an expansive one through Google search.
There is gold to mine right there in the Command Box. But let’s get back to the fresh note you’ve made.
After you’ve saved your note, the line you initially scrolled across will default to a yellow highlight.
- Tip 1: If you want just the note and not the yellow highlight (since yellow may conflict with its specific assignment), re-scroll it until the “choice of color” box appears with yellow X’d. Either tick it and the highlight disappears, leaving only the page icon, or simply click on a more appropriate color. Zingo!
- Tip 2: Suppose you have 5 or 6 important uses for your color-coded highlighter, but only the four colors. This is where the note box comes in handy. For your 5th or 6th color, simply use one of the 4 color choices. Highlight the text with that color, and then scroll over the first word in that highlighted sentence. That will reopen the box. Choose “Add Note.” Type in an asterisk and then the Topic used for that shared color. (You’ll understand the asterisk later.) It will then appear above the first word in the highlighted sentence, while all other notes will be above the last word. Make sure you include the borrowed color and the new Topic in your color-code index.
- Tip 3: I use all caps since the font for notes is very small, but that is by personal choice.
We can cover this in a simple paragraph or two. The bookmark icon is on the upper taskbar, next to “Show Notebook.” It’s a little black ribbon with an X in it. When you click on it, a blue ribbon appears in the upper right of the text.
As with highlighting (but unlike Notes), be entirely intentional when you bookmark. Use it only when something very important is happening on that page. Otherwise, when you finish, the pages that are truly important become indiscernible.
A Deeper Dive
So far you have, hopefully, learned a few new things and have added a couple of refinements to your Kindle Learning Environment.
Now let’s put on our diving gear.
The Features on the Left Panel
- Search/Find: There’s no learning curve to using this feature. But we often trudge ahead past a confusing concept, hoping it will clear itself up later. It probably won’t. Today, I was putting my three hours in on a book that promised to teach me quantum physics. I’d been at it for a week. I’m no scientist and I have trouble adding a string of single-digit numbers. But I took the challenge.

I came across the term “interference bands” and knew I’d read about it earlier but I didn’t have a solid grasp of it. So I clicked on the magnifying glass, above, and typed in “interference. ” As you can see it indicates there were 12 matches, showing to the right of each box what page (or in this case, location) it is on. Click on that box and it takes you directly to the location.
The takeaway is that with any other book, I’d have been searching the index and the glossary. If I was lucky enough to find it, I’d have to flip to that page. Not so in our Kindle learning environment.
- Flashcards: I can hear you now saying, “What am I, in the 5th grade?” But as I mentioned before, if you approach these seemingly juvenile techniques creatively you may find a novel use for them. Personally, I use flashcards now for my affirmations, but I plan to make a new deck for some of the quantum physics formulas. It is simply another learning tool to have in your toolbox. (Keep in mind, the flashcards stay with the book you are reading, and do not migrate to other Kindle books. So I have to remember where I’ve docked my affirmations.)
As you study, highlight. take notes, and bookmark important pages, the Notebook—which is hidden from your view—is busy organizing the various elements of your learning.
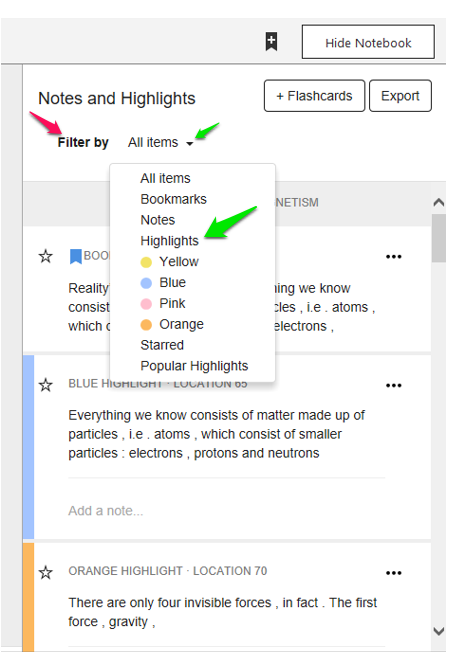
It’s only when you understand the full extent of the organizational magic that Kindle has provided in the Notebook that you realize how important it was to adhere to the principles of 1) intention, 2) consistency, and 3) flexibility.
Now, when you filter your highlights by a specific color, you’ll have every highlighted sentence for that Topic grouped together, chronologically by page or location. So you can begin at the top of the grouping and follow the natural development of that topic through the book.
Also, each box that contains a highlight, has a section below it for a note. If you’d made a note for that highlighted sentence, it would show here (including a note with an asterisk at its beginning and a Topic for the borrowed color.) You can also add a new note or modify an existing one here. Whatever you modify in the notebook is saved under the icon on the page.
I hope you enjoyed our little promenade through the Kindle for PC¹ features. More than that, I hope you will use it as a method for deepening your learning experience.
¹NOTE: I receive no commission or other incentives from Amazon when you download your Kindle for PC.
 Recognized |

|

© Copyright 2025. Jay Squires All rights reserved.
Jay Squires has granted FanStory.com, its affiliates and its syndicates non-exclusive rights to display this work.
